
Before you begin: Read the updates at the bottom of the page. This post was written for an older version of the YUI library.
I’ve had nothing but good things to say about the Yahoo User Interface tools. It seems to me like the developers continually add all the things from other libraries that I like into one simple to use, well documented, overall good quality library.
The new addition of the rich text editor has left me no less pleased. I can now ditch the other editors I’ve used in the past in favor of one that will be maintained. (I’ve tried two that worked, but were becoming out-dated and didn’t really have support.)
Yahoo’s RTE has a great dialog for modifying images. You can’t use it to upload images from your computer however. So far, every situation I’ve needed an RTE has called for the ability to add images from the users hard drive. I’ve created an extension that modifies the RTE image dialog to include a new input for browsing to an image. It uses the Yahoo Connection manager to upload the image in the background to your server, and then displays the image in the RTE after the file is successfully uploaded.
Here is how to use it:
-
Place the required source code dependencies for YUI Editor and YUI Connection Manager in your html.
<!-- Skin CSS file -->

<link rel="stylesheet" type="text/css" href="http://yui.yahooapis.com/2.3.1/build/assets/skins/sam/skin.css">

<!-- Utility Dependencies -->

<script type="text/javascript" src="http://yui.yahooapis.com/2.3.1/build/yahoo-dom-event/yahoo-dom-event.js"></script>

<script type="text/javascript" src="http://yui.yahooapis.com/2.3.1/build/element/element-beta-min.js"></script>

<!-- Needed for Menus, Buttons and Overlays used in the Toolbar -->

<script src="http://yui.yahooapis.com/2.3.1/build/container/container_core-min.js"></script>

<script src="http://yui.yahooapis.com/2.3.1/build/menu/menu-min.js"></script>

<script src="http://yui.yahooapis.com/2.3.1/build/button/button-beta-min.js"></script>

<!-- Source file for Rich Text Editor-->

<script src="http://yui.yahooapis.com/2.3.1/build/editor/editor-beta-min.js"></script>

<!-- Source for Connection Manager (Required for yuiImageUploader) -->

<script src="http://yui.yahooapis.com/2.3.1/build/connection/connection-min.js"></script>
- Download the yuiImageUploader Source and add it to your included javascript dependencies
<script src="/yui-image-uploader.js"></script>
- Instantiate your editor the same as you normally do. Then modify it with the yuiImageUploader function. The parameters for the function are the editor instance, the url to upload the file to, and the parameter name that the file will be uploaded with.
var myEditor=new YAHOO.widget.Editor('rte_div',cfg);

yuiImgUploader(myEditor, '/upload_url','param_name');

myEditor.render();
-
Implement your upload handler on your server. I’m assuming if you’re looking for this functionality, you already know how to do this. The important thing is the response. The content of the response is a JSON object. You must return a response with the Content-Type header set to ‘text/html’ however, because IE will attempt to open the response in a new window if the Content-Type header is something other than ‘text/html’. Your object needs to have a status and an image_url variable. For a successful response, just return:
{status:'UPLOADED',image_url:'/the/url/of/the/image'}
For a failure, modify the status variable to be an error message that can be shown to the user:
{status:'The image was too big.'} - When your users click on the image button on the RTE editor, the yuiImageUploader modifies the image dialog to have an additional file field for uploading an image:
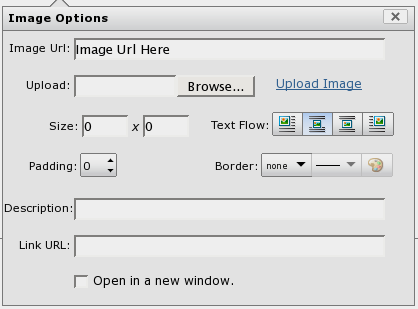
The upload is done in the background with the Connect object provided by Yahoo’s Connection Manager. If everything works ok, the URL returned by the server is placed in the image url input and the image is shown in the editor.
That’s it. You can download the file here.
Enjoy.
Update:
I’ve created another post that shows a working example here.
Update:
I’ve added another example, this time with the server side script being implemented in PHP.
Update 10/31/08:
Thanks to bkinsey for providing updates to the client script for use with YUI 2.6. You can see his comment below or I’ve added downloadable file here.
Update 11/6/08:
I corrected errors in the script and added a working YUI 2.6 Image Uploader example.
Update 02/16/09:
Vijay Oruganty has provided a Java upload handler for the YUI image uploader.
Update 07/01/09:
I’ve added a working example with the 2.6 uploader and YUI 2.7. YUI 2.7 Image Uploader
Update 06/16/10:
Working example with YUI 2.8.1 added. Tagged the uploader git repository tag_v2.8.1. YUI 2.8.1 Image Uploader

Hello Dennis,
nice Extension, thank you very much!
One little thing: Your tutorial says that the function name is “yuiImageUploader”, but in your downloadable script the name is “yuiImgUploader”.
Thanks for the catch! Fixed.
Can you post an example of your code? I am having difficulty in adding the yuiImgUploader(); to the RTE.
Unfortunately, this server doesn’t have the ability to upload images 🙁 If you give details on what you’re having trouble with though, I may be able to help resolve the issue or update the article with more information.
Basically, this is the code I have so far:
var myEditor = new YAHOO.widget.Editor(‘msgpost’, {
height: ‘300px’,
width: ‘700px’});
myEditor.render();
yuiImgUploader(myEditor, ‘/upload_url’,’param_name’);
When I add the yuiImgUploader function, the browse option does not come up. I have downloaded the .js file and put it in the proper place but it is still not displaying.
Thanks for the help.
In my usage, I put the yuiImgUploader call before the render call. Does that resolve the issue?
I tried that first, but this causes the whole RTE to fail, and I am left with just a textarea.
Interesting, I just tried it either way and it worked find. Perhaps an error is being generated. Do you have a logging pane available to see if there is something failing underneath the hood?
I have Firebug, but it is not reporting any Javascript errors. I placed an alert to display the various errors in your catch statements, and came back with “ReferenceError: $ is not defined”. This was for “ee”.
Woops, bug in the script.
That should be Dom.get instead of $
I’ve fixed the upload. The $ function is a dependency on another JS Library that I’ve been converting from.
That was it! Thanks for the help 🙂
How about a demo?
Dav Glass is working on integrating a demo into the YUI examples section for the editor. I’d provide one here, but I don’t have the ability to upload images to this server.
Wow, I was planning on writing something similar this weekend… Thanks!
It looks like you have a bug in your response handling code. I think this:
if (o.status=’UPLOADED’) {
should probably be:
if (o.status == ‘UPLOADED’) {
Hello Dennis,
my IE6 trys to open a new document unless I leave the Response Content-Type simply away.
At http://www.wrox.com/WileyCDA/Section/id-291408.html Nicholas C. Zakas says:
“There’s no need to set the “Content-type” header for POST requests. The Connection Manager handles this for you behind the scenes.”
Sorry, I think I have to correct a mistake in my last post. Nicholas C. Zakes talks about the Request- not the Response Header.
Good Catch Mike! Fixed.
Tobi, I’ll play around with this more in IE and edit the document accordingly today. I stuck that in because I had the same problem a while back where IE was trying to open the document in a new window. I may have remembered incorrectly how I fixed it.
Tobi, You’re correct. I had it backwards in my tutorial. You have to set the content type to text/html Even Though the response is JSON. I think it would be fairly straight forward to pass in a function for a success handler as one of the parameters. That way you could return whatever you want from the server, and then simply have your success handler return the new image url. There is no specific reason to have the server return a response in JSON format other than it is convenient to parse.
Hi Dennis,
I substituted the toolbar addListener from “buttonClick” to “insertimageClick” to show the image uploader also in “edit mode”, not just in “insert mode”. Perhaps someone is interested in:
function yuiImgUploader(rte, upload_url, upload_image_name) {
YAHOO.log(“Adding Click Listener” ,’debug’);
rte.addListener(‘toolbarLoaded’, function() {
rte.toolbar.addListener(‘insertimageClick’, function() {
var imgPanel = new YAHOO.util.Element(‘yui-editor-panel’);
/* … */
});
});
}
Thanks Tobi,
Good suggestion. I’ve uploaded a new file that contains all the changes suggested so far.
Hi,
how do I implement the upload handler? (noob) i am trying to get the image upload in the yui component for Drupal CMS.
You can check out the example I posted:
http://allmybrain.com/2007/10/22/yui-image-uploader-example-with-turbogears/
My example however, is with TurboGears. The concepts are the same for most frameworks I’d think though.
Well thanks for your answere, but thats too hard for a noob ^^
if you are conform with Drupal you may can check out the issue here:
http://drupal.org/node/183216
projectsite:
http://drupal.org/project/yui_editor
that would be really nice 🙂 if not its ok too, greetings from europe
:'(
I don’t have experience with Drupal. I’m sure I could create a plugin for it to handle the uploads, but I just don’t have the time to look at it right now with my other projects. Unfortunately, the best I can do at present is refer you to the Turbogears example I posted
>yuiImgUploader(myEditor, ‘/upload_url’,’param_name’);
I dont know what ‘param_name’ is gonna be…
Could somebody tell me what it is?
Thank you.
It is the name of the parameter that your server expects to receive the image with. You might name it “image” or “file” or “picture”. It really doesn’t matter. Whatever you name it, the file will be posted to your server url with that parameter name. You can look at the working upload example if you want more details.
http://allmybrain.com/2007/10/22/yui-image-uploader-example-with-turbogears/
Is it possible to do this without python? Only with SQL and PHP?
*bothering you until you watch the links above and solve the problem ^^*
Greetz from Europe, XerraX
Any server side language should do. You just need to accept the file, store it somewhere, and return the URL for the image that the Editor can display.
Has anyone ever encountered problems with this script on IE7? On the upload handler it tells me that r.responseText is undefined.
Excellent script by the way!
You may be having a server error. You can try my working example with IE and see if that works for you. (Linked at the end of the article.)
I’ve found FireBug with FireFox is really nice for seeing what the request/response actually contain if that helps.
I didn’t see the working example before, so thanks for pointing it out. Downloading that example and playing with some values helped me figure out the issue.
For .NET devs out there, I had to modify the image handler I had written to add a context.Response.Flush() followed by context.Response.End() to get this working. My full test handler code is here (I just spit back Google’s logo instead of handling the image for testing purposes):
context.Response.ContentType = “text/html”;
context.Response.Write(“{status:’UPLOADED’,image_url:’http://www.google.com/intl/en_ALL/images/logo.gif’}”);
context.Response.Flush();
context.Response.End();
Thanks again for this script. I intend on adding to a (free) open source project that I started very recently (YUI.NET); crediting this website for the image uploading piece. Anyone is free to check it out and use it, just know that it is extremely limited at this time and is not truly ready for public consumption yet: http://opensource.openbracketllc.com/yuinet
Thanks again
Greetings everyone.
I’m a total programming newbie, however i’ve managed to get this awesome extension working…well, almost. I’m building a CMS using PHP & MySQL, and i perfectly know how to upload images from a normal form with a PHP script that gets the image file from the $_FILES[‘param_name’] global variable, but this doesn’t seems to work in this case. Please, if anyone could tell me how should i write my PHP image upload handler i’ll be very grateful. Thanks in advance.
This is pretty great. If anyone is looking for a companion php upload script, I used Easy PHP Upload without too much trouble. It’s not my script so I can guarantee it or anything, but find it here: http://www.finalwebsites.com/snippets.php?id=7
Joe, or anyone else, do you think you could post instructions for setting this up via PHP. For the life of me I can’t get it to work. Thanks!
I’ve got it on my slate to post a PHP working example. I won’t be able to get to it for another couple weeks though. If in the mean time, anyone has an example already working, you’re more than welcome to post it.
I’ve done it, this is my working php script. (GD must be enabled to do it this way)
Thanks Dennis, this extension you made works great, it should be included on the default YUI Library.
Geetings form Guadalajara, Mex.
//defining a function to open theimage (only jpg/gif/png)
function openImage ($file) {
# JPEG:
$im = @imagecreatefromjpeg($file);
if ($im !== false) { return $im; }
# GIF:
$im = @imagecreatefromgif($file);
if ($im !== false) { return $im; }
# PNG:
$im = @imagecreatefrompng($file);
if ($im !== false) { return $im; }
return false;
}
//if file has been sent successfully:
if (isset($_FILES[‘image’][‘tmp_name’])) {
// open the file
$img = $_FILES[‘image’][‘tmp_name’];
$image = openImage($img);
//if image can’t be opened, either its not a valid format or even an image:
if ($image === false) {
header(“content-type: text/javascript”);
echo “{status:’this is not a valid format’}”;
return;
}
//the following is an optional image resizer.
// get original size:
$width = imagesx($image);
$height = imagesy($image);
// define new size (fixed width in pixels, proportional height:
$new_width =450;
$new_height = $height * ($new_width/$width);
// create a blank jpg image with the new sizes:
$image_resampled = imagecreatetruecolor($new_width, $new_height);
// copy the original image into the new one
imagecopyresampled($image_resampled, $image, 0, 0, 0, 0, $new_width, $new_height, $width, $height);
// create a new random numeric name to avoid rewriting other images already on the server…
$ran = rand ();
$ran2 = $ran.”.”;
// define the uploading dir
$path = “storing/path”;
// join path and name
$path = $path . $ran2.’jpg’;
// copy the image to the server, alert on fail
if(!imagejpeg($image_resampled,$path, 100)) {
header(“content-type: text/javascript”);
echo “{status:’error copying the image on server’}”;
}
} else {
//image wasn’t even sent:
header(“content-type: text/javascript”);
echo “{status:’no file was sent!’}”;
}
//everything alright…
header(“content-type: text/javascript”);
echo “{status:’UPLOADED’, image_url:’$path’}”;
well obviously i can’t post code here hehe
you can see it here:
http://www.babybabybaby.com.mx/yui_image_uploader_php_working_script.txt
Thanks Alex! You can post code here, it just needed moderated 1st.
I tryed to use your exapmle (http://allmybrain.com/yuieditor/) on my hosting. It doesn`t work, though server supports uploading files.
http://razd.users.ru/bI.html
Can you help me, please?
Hi Tremor, using Firebug on FireFox, I watched the Net window show what was happening. It appears you’ve uploaded the script to a different directory. The script tried to post to /yuieditor/upload_image and it received a 404 status from the server.
Thank you 🙂
And where i should put this folders?
It doesn’t matter. You just need to pass the location where you’ve uploaded it to the yuiImgUploader function. Look at the 2nd parameter of the function and make sure that is correct.
Thanks a lot.
But now i have a new problem.
Can you advice me, if u don’t tired to help me? 🙂
http://razd.users.ru/bI.html
Perhaps you should email me directly.
Alex, thanks for the PHP upload script. However, this is all new to me. I understand how to direct a form to a PHP script for processing… but this method via AJAX is blowing my small mind. How do I get it so that when the upload link is pressed -> the PHP script is processed -> the file is uploaded –> file information is returned and displayed in the editor?
Where should I place the function you supplied so that it can be executed? And would the yuiImgUploader call be written like this: (file used because of $file in the script)
yuiImgUploader(myEditor, ‘/upload_url’,’file);
I apologize for the newb questions… but I have tried everything I can think of to get this to work and am running a little dry. Thanks in advance.
I’ve figured out many of my questions posted above — however I am stuck now at place where I find that when I click “Upload” — no POST information is transfered. My test page is here: http://www.avencrest.com/test.php. Anyone have any ideas? I am using the PHP script posted my Alex. Thanks!
Hi Cyle,
I just tested your page. Your upload parameter to the yuiImgUploader function is set to “/upload_image”. There is no trailing slash. When I posted an image, I 1st got a redirect (301) to “/upload_image/” and then the request was made. I believe this is why your script doesn’t work. Just stick the trailing slash into your parameter so the POST isn’t redirected and then you won’t loose the posted image.
-Dennis